Setting up your Xfinity WiFi can seem daunting, but with the right steps, you can get your network up and running smoothly. Whether you’re a new Xfinity customer or upgrading your equipment, this guide will walk you through the process to ensure your WiFi is set up correctly.
Unboxing Your Xfinity Gateway
When you receive your Xfinity Gateway, ensure that all components are included in the package. You should have the following items:
- Xfinity Gateway (modem/router combo)
- Power cord
- Coaxial cable
- Ethernet cable
- Installation guide
Connecting Your Gateway
Step 1: Choose a Location
Select a central location in your home for your Gateway. This helps ensure a strong WiFi signal throughout your house. Avoid placing the Gateway near thick walls, metal objects, or other electronics that might interfere with the signal.
Step 2: Connect the Coaxial Cable
Connect one end of the coaxial cable to the cable outlet in your wall and the other end to the back of the Gateway. Make sure both connections are secure to avoid any interruptions in your internet service.
Step 3: Power Up
Plug the power cord into the Gateway and then into a power outlet. Turn on the Gateway by pressing the power button, if it has one. The Gateway will take a few minutes to boot up and establish a connection. You will know it’s ready when the light on the front of the device stops blinking and stays solid.
Step 4: Connect Your Devices
Use the Ethernet cable to connect your computer directly to the Gateway for the initial setup. This ensures a stable connection while you configure your WiFi settings. You can remove the Ethernet cable once the setup is complete and connect wirelessly.
Configuring Your WiFi Settings
Step 1: Access the Gateway Admin Tool
Open a web browser on your connected device and type “http://10.0.0.1” into the address bar. This will take you to the Gateway’s login page. Use the default login credentials (usually found on a sticker on your Gateway) to log in.
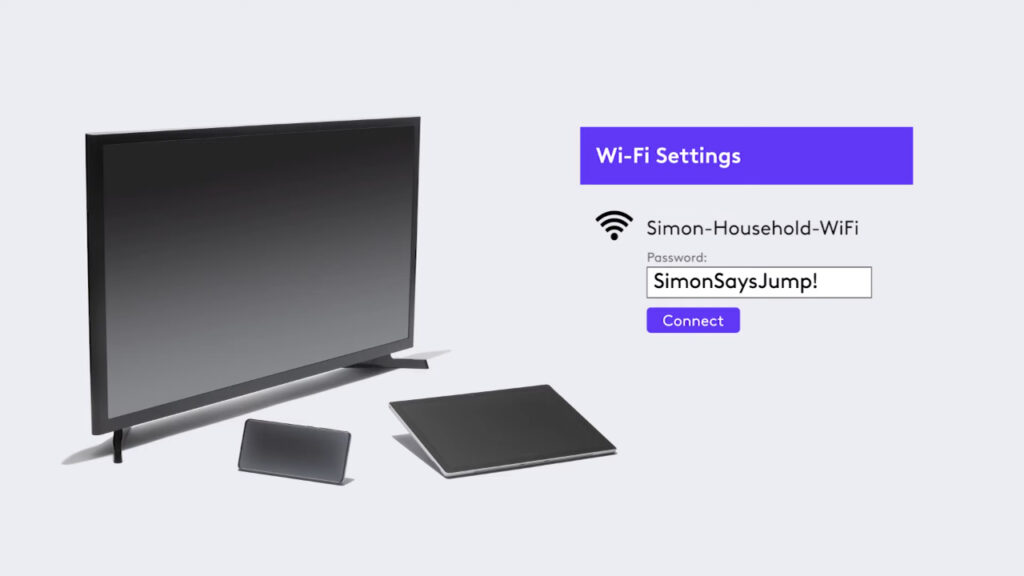
Step 2: Set Up Your WiFi Network
Navigate to the “Wireless” section of the admin tool. Here, you can set up your WiFi network name (SSID) and password. Choose a unique and easy-to-remember network name and a strong, secure password to protect your network from unauthorized access.
Step 3: Save and Reboot
After entering your desired WiFi settings, save the changes and reboot your Gateway. This can usually be done through the admin tool interface. The reboot process may take a few minutes. Once complete, your new WiFi settings will be applied.
Connecting Devices to Your WiFi
Step 1: Locate Your Network
On your wireless devices (smartphones, tablets, laptops), go to the WiFi settings and look for the network name (SSID) you created during setup.
Step 2: Enter the Password
Select your network and enter the password you set up. Your device should connect to the WiFi network. Repeat this process for all other devices you want to connect to your network.
Troubleshooting Common Issues
Issue 1: No Internet Connection
If your devices are connected to WiFi but there’s no internet access, try restarting your Gateway. Unplug the power cord, wait for 30 seconds, and then plug it back in. Allow the Gateway to reboot and check the connection again.
Issue 2: Weak Signal
If you experience weak signals in certain areas of your home, consider relocating your Gateway to a more central location. Alternatively, you can invest in WiFi extenders to boost the signal strength throughout your home.
Issue 3: Forgotten Password
If you forget your WiFi password, you can log back into the Gateway admin tool using the Ethernet connection and reset the password in the wireless settings.
Conclusion
Setting up your Xfinity WiFi doesn’t have to be complicated. By following these steps, you can ensure a smooth and efficient setup process, providing your home with reliable internet access. If you encounter any issues beyond basic troubleshooting, contacting Xfinity customer support can provide additional assistance. Enjoy your new Xfinity WiFi connection!
For more detailed information and support, you can visit the Xfinity Support page.
Can you set up Xfinity WiFi on your own?
Absolutely! Setting up your Xfinity WiFi is a straightforward process that you can do yourself. With clear instructions and a little patience, you’ll be connected to the internet in no time.
How to activate Xfinity WiFi?
To activate your Xfinity WiFi, follow these general steps:
- Connect your equipment: Connect your modem and router to the wall outlet and each other using the provided Ethernet cables.
- Power on: Turn on your modem and router.
- Wait: Allow your equipment to boot up completely. This may take a few minutes.
- Connect your devices: Once your equipment is online, you can connect your devices (like smartphones, laptops, and tablets) to your WiFi network. You’ll typically find the network name (SSID) and password on a sticker attached to your router.
How do I set up my new Xfinity WiFi?
Setting up your new Xfinity WiFi is a breeze. Follow these simple steps:
- Unbox: Unbox all the equipment provided by Xfinity.
- Connect: Connect your modem to the wall outlet and then connect your router to the modem using the provided Ethernet cables.
- Power on: Turn on your modem and router.
- Wait: Allow your equipment to boot up completely.
- Connect devices: Once your equipment is online, you can connect your devices to your WiFi network using the network name (SSID) and password provided.
Need more specific instructions? Visit https://www.xfinity.com/support for detailed setup guides and troubleshooting tips.